- Give the data sheet for the LM741 op-amp a quick review noticing all the associated specifications.
- Sketch the pin-out (connection diagram) for the LM741 you received in your packet with the graphical representation of the op-amp overlaid to show connections. Show this diagram to your lab instructor to make sure all the connections are understood before proceeding (wrong connections will likely damage the op-amp in a hurry).
- Note how to tell the location of pin 1 on the integrated circuit.
- Note the absolute maximum supply voltages that should be used to power the op-amp.
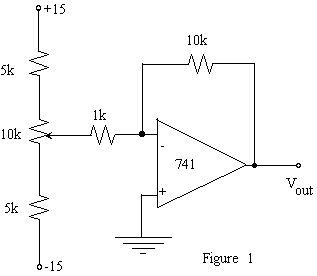
- Wire up an inverting amplifier having an input resistance of 1kW and gain of -10 as shown in figure 1. Use a LM741 op-amp with supply voltages of plus and minus 15V. Employ good breadboard technique by using the bus lines on your breadboard for each of the supply voltages and ground.
- Vary the DC level of the op-amp input by turning the 10kW pot and take a couple of measurements to confirm that the amplifier is working as expected.

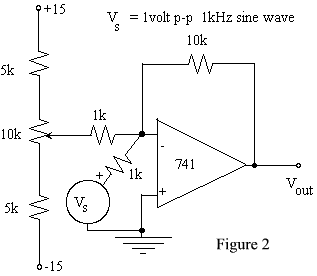
- Add a 1kHz, 1Vp-p sine wave (shown as Vs) to the amplifier input as shown in figure 2.

- Measure the gain for several input amplitudes and compare with the theoretical gain.
- Confirm that the amplifier inverts the input by displaying both input and output sine waves on the scope (sketch waveforms).
- Vary the DC level of the input by turning the 10kW pot and confirm that the amplifier is summing the two inputs.
- Remove the DC input and apply only the 1kHz, 1Vp-p sinusoidal input through an additional 1kW resistor as shown in figure 3.

- Calculate the amplifier circuit's input resistance looking into the amplifier circuit from the node labeled V1, at 1kHz, using the node voltages VS and V1. Question: Why use this size of resistor - why not a larger or smaller value?
- Measure (or try to) the output resistance of the amplifier circuit by representing it with a Thevenin equivalent circuit that can be found by putting a 1kW resistor from the output to ground and noting how much the output voltage changes. The change in the output voltage can be thought of as a voltage divider between Rout and the 1kW resistor. Question: Why use this size of resistor - why not a larger or smaller value?
- Increase the input amplitude to determine the voltage levels at which the output 'saturates'. How do these voltages compare to the supply voltages?
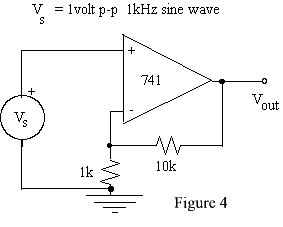
- Wire up the non-inverting amplifier shown in figure 4. What is the amplifier's voltage gain? (Note: it's not the same as the last circuit.)

- Measure its input resistance, at 1kHz, by putting a 100kW or 1MW resistor in series with the input VS. Question: Why use this size of resistor - why not a larger or smaller value?
- Does this configuration maintain the low output impedance you measured for the inverting amplifier?
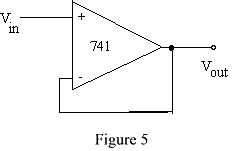
- Build a follower with the 741 op-amp as shown in figure 5. Check its performance, in particular measure (if possible) Zin and Zout.
